Thursday, December 31, 2009

2009 is almost history!


My tapestry diary is complete although still on the loom.  I'll cut it off, with my husband's help, before midnight.  Photo was taken with my phone--I'll post a better one maybe tomorrow.

Just a few more hours remain of this year--so, here's an early Happy New Year!  May 2010 be full of health, happiness and productivity.

Tuesday, December 29, 2009

warped... and ready to weave


Good friends were in town to spend several days with us at Christmas so I didn't begin the warp for this new/old loom until Sunday afternoon.  I'd hoped to warp it 36" wide but thought my warp stock of the 30/18 Finnish cotton seine twine wasn't enough to allow for that.  I used the warping reel to measure off 24 ends at a time and, working from the middle to each side, attached ends until I ran out of the warp.  That gave me a 24" width so I chose to only install one of the heddle bar sets rather than both that I'd have used for a wider width.  That's just as well since I juggled the heddle bars quite a bit before settling on a way to keep them suspended while I threaded (a few hissy fits were involved, too).  

I decided to roll the warp with corrugated cardboard (which I ran out of before completing the turns so ended with a couple of wraps of kraft paper).  I don't like surprises of warp tension loosening during the unwinding for new warp that I'd get when winding the warp turns on themselves.  I also didn't tie the warp directly onto the bar of the bottom beam... rather, I tied overhand knots of 8 ends each (1" bouts) and lashed those to the lower bar.  That way I was able to adjust the evenness of the warp a bit more easily before tightening.

I wound the knotted and lashed bouts onto the bottom beam with a layer of corrugated paper to keep the knots from poking into the tapestry once it starts to be wound onto the beam.  I next wove in four picks of wooden lath strips, then several passes of the seine twine above the lath, followed by a row of twining and then another pass of the seine twine.

Now the warp is ready for a hem and the tapestry will begin soon.  Cartoon designing comes next and may take a few days.  My ideas for the kudzu tapestry aren't in place yet...  lots more looking, thinking, sketching, Photoshopping, revising, thinking some more, and looking again--with critical eye--to complete the cartoon before I begin the weaving.  SOON, I hope!

Thursday, December 24, 2009

new loom... new tapestry thoughts

I've given myself a present--a 4' Shannock tapestry loom!


Here it is at the studio, instructions sheets for assembly all around...

 It became available a few days ago and after a day and a half of back and forth e-mailing so I could first commit to the loom, then have the kind seller measure to see if would fit into my station wagon, I made a 12 hour round trip drive to pick it up.  It's been owned by a couple of other tapestry makers since its "birth" in the early 1990s and I'm very glad to know a little of its history.  Needless to say I'm quite excited to have the opportunity to have it with me.  All of my looms, except for the Archie style ones I've built and the Hagen looms, previously lived elsewhere and did fine jobs while with their other studio companions.  Now, I very much appreciate having them occupy my studio and take part in my various tapestry adventures.

New loom--new year--new tapestry thoughts bubbling away.  First, though, I'll finish of the 2009 tapestry diary in a few days--just a week more to go before putting the end to it.  I've decided to use Braille as the dating method (thanks for the several suggestions pointing me in that direction).  I've woven a sample of what 2009 would be and it will fit the look of the other date markings of the tapestry, I feel.


For the new year's tapestry diary I'll put a warp on a frame loom, as I mentioned in an earlier post, so I can take it with me when traveling.  Instead of weaving "blanks" of white when I'm away from the weaving for a day or more, next year I'm thinking of leaving unwoven warp on those days, securing at top and bottom in some way.  Holes in the fabric of my time, I guess one could say.

And... here are a few photos I'll be working from as I develop the next tapestry... kudzu --leaves, vines, flowers, seed pods. Took these a few years ago for another tapestry I was designing but didn't use them then.  Why kudzu?? More about that later!


kudzu


Saturday, December 19, 2009

Paper weaving days--lots of fun


ECHO Arts School
Tiger, GA

Peggy McBride, owner of Globe Gallery in Clayton, GA recently opened this wonderful venue for teaching small, affordable classes.  The school is in a newly renovated house located near Tiger, Georgia.  It's in the woods on a ridge and views from the porch were beautiful (not that I was on the porch very much because it was quite chilly last week).


Another view of the rambling house that has lots of open space for classes.

My class was on three consecutive days--Thursday, Friday and Saturday--but each day's session was a complete activity.  The sessions were from 11-2 each day (with a lunch break); and each day one or two folks continued to work past 2 p.m., just fine with me since I was staying at the school for the week.

Three students were there on the first day, two of whom returned for the second day to be joined by three new folks--five for Friday.  Then on Saturday two returned from the Friday group and were joined by one new person.  So... a total of eleven sets of hands doing paper weaving during the three days even through four sets of those hands were of  returnees... confusing?

As I'd mentioned in an earlier post, I've used paper weaving for many years.  While I don't do it often it is always a great way to get some visual things happening--and I have, in fact, used the method to design tapestries.  And... Suzanne Pretty's designing with paper weaving as an art form and as inspiration for tapestry is amazing; her work is seen her website here:  http://suzannepretty.com/index.htm


Our class was the only one being held during the week so we spread out throughout several rooms.  Above is the long table we all gathered around to do the weaving.


I always bring examples and supplies, and Peggy has lots of supplies at ECHO, too.  She's teaching book arts classes on an ongoing basis so many tools and materials were on hand from those classes.


Almost finished on day one, with Helen on the left, Charles at the end of the table, and Midge on the right putting finishing touches on their weavings.


Charles made use of warm/cool contrasts combined with punching holes in assorted strips to create a vibrant color play.  He added some of the dots from punched holes to the top of selected areas, also.


Second day brought Robin (at the table's end) and Mary Grace to the group, as well as Joy... who was cutting paper in the other room when I took the photo of our weaving table... here's Joy at the paper cutter...


Helen, back for the second day, worked diligently to cut around the wolf photo that I'd scanned and printed from one she brought.  After completion, I rescanned and printed onto photo paper... looked really good.


Mary Grace had several photographs from her ancestors that I scanned and enlarged so she could cut and weave with twill pattern... you can see those to her left.  Her family photos showed ancestors who were spinning and weaving!  On the back of the photographs were descriptions written by her mother; she combined the handwritten information as the weft strips, interwoven into the carefully cut photograph scan... really was a stunning piece when she finished.


Roseann brought several photos to work from, but decided the colorful Barbie pattern cover from the 1970s would be a cheerful warp for bright weft colors.  So the pattern envelope was scanned, then she cut into the printed results rather than the actual object.  Looked great in the bright childlike colors.  Roseann is one of the founders of Bead Amigas ; she's wearing several of the paper beads made by the Nicaguaran women with whom the group works.


Robin was carefully constructing this last paper weaving she did in the class with a reverse twill repeat.  She and a friend have an business designing and selling greeting cards of all kinds.  Their website is at this link: www.ryckycreations.com


One of the things I learned as the class started was to use bamboo skewers to help with the lifting of the paper warp strips--that "learning" took place out of necessity since the tips of my thumb of my right hand and several finger tips had split open from the cold weather.  This happens to my hands every year, along about the time the temperature drops and heating begins to be used inside.  Pretty dang painful to try to manipulate paper strips, lifting them up, over and over again.

These skewers also work as a shed stick, once they're woven across:


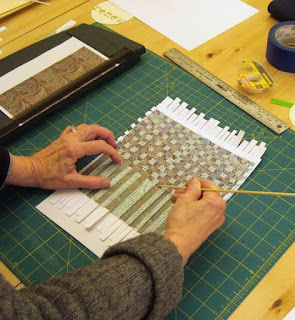
and then the tip of the skewer can help slip the weft into place closely to the last strip.

After the classes were over I was spent several more days in residence at ECHO doing more paper weavings, getting some reading done, and also driving the few miles to Hambidge Center to complete the runners for the Center that I'd begun as a demo during their summer festival.  Got them with me to do end finishes through the holidays--maybe!


Sunday, December 6, 2009

off to the ball


I really feel like Cinderella sometimes... I don't dress up often but there are some occasions that need it.  Last night was one of those times with the Challenged Child and Friends Festival of Trees gala.  So here we are, ready to go.  And, by the way, a friend bought the small tapestry for close to $300!  I'm happy it sold and was an addition to the money raised during the evening from both the silent and live auction of art works and other things.

Oh... the dress I'm wearing is a vintage gown.  I'm not one to go out shopping for any formal wear, much less something like this!  My comfort level in clothes is blue jeans.

Wednesday, December 2, 2009

Last month of the 2009 tapestry diary


It's hard to believe almost a year has passed since I began this adventure of weaving every day on a piece I've called my "tapestry diary" or "tapestry calendar" or "woven calendar."  It's certainly recorded my days of this year, even the days I've been out of town have been noted with the white bits I call "blanks."  As I'm approaching the end of December I'm wondering how to finish off with some indication of the year 2009.  I don't think I want to simply weave 2009.  I've thought about Roman numerals for the year--but don't like that particularly.  I've looked at other number notation systems on the web and haven't yet found anything that would make weaverly sense.  Any suggestions?

Now... for 2010.  I want to begin anew for the next year, this time on a frame loom that I can take with me when I go out of town.  I'll probably have more changes to make in my approach but will continue to use bits and pieces of weft bundles left over from other tapestries.  Maybe next year I won't mark each day with a notation of date, just weave a bit every day but keep each day's part distinct from the previous one in some way.

Other weaving is going on right now, just not much tapestry.  I always like to weave gifts for the holidays and I've spent the past two days getting the 4-shaft loom dressed and threaded for that.  I've learned a new method of warping (after being perfectly happy with the way I've done it for decades).  I read about a trapeze system on WeaveTech and did a make-shift version using my Brennan plumbing pipe loom.  I'll post photos of that later--pretty nifty way to warp!  I got a 4-yard warp on in less than an hour and without having to strain my iffy hands with popping and pinging and pulling to ensure the warp wound onto the beam evenly and with correct tension.  Lots to learn about all kinds of things in weaving--that's what continues to keep me interested (among other things).

Monday, November 30, 2009

Saturday, November 28, 2009

this one's off the loom... now to finish it

I cut off the small tapestry of the trees and waterfall a short while ago.  I'll let it rest overnight (or is that I'll let myself rest overnight?)--anyway, some resting will take place before the next steps of the finishing process.  Here's the small tapestry ... raw from the loom:


This will be mounted onto a natural color handwoven twill fabric that I'll stretch over a board; I'll cut the board to be slightly larger than the tapestry to leave have about 1/2" on all four sides or whatever amount will allow me to use a frame I have on hand.  I haven't measured what I've got yet but I think I have an 8 x 10" shadowbox frame and that would work just fine for this piece.

Before stitching the tapestry on the fabric covered board I'll use a half-Damascus edge to complete the end finish.  That will take the warp ends to the back of the piece.  I might block the tapestry before doing the ends; I'll decide on that tomorrow after seeing how it looks after relaxing for the night.

This piece was woven at the end of a warp threaded on the Tissart loom--I'd mentioned that before but thought I'd show the loom with the several smaller weavings that are happening side by side.  Cutting this one out has left a gaping hole but there's several inches of weave-able warp remaining.


I'll tie it back onto the cloth beam bar, by lashing on like I did for this part, once I've woven the other sections up to that point and cut them off.


I don't always have enough warp remaining on a wider piece to use for smaller things but when I do I try to squeeze as much out of the loom as I can.


Wednesday, November 25, 2009

A fantastic web exhibition of tapestries!

I just have to note this link to a web exhibit of tapestries by Inyul Heo, a Korean artist.  It's curated for ATA by Barbara Burns and please visit and experience movingly beautiful art works!

Tuesday, November 24, 2009

next tapestry underway...


... this is a small one I started last Saturday.  I'm doing it for an auction that will be held on December 5 during the annual Festival of Trees to benefit Challenged Child and Friends, an organization in north Georgia that serves children with disabilities and their families.  My husband and I have taken part in fund raising auctions with this group for several years now.

The tapestry will be 8" w x 10" h.  The sett sett is 8 epi, a cotton seine twine warp remains from a previous large tapestry woven on my Tissart loom.  For weft I'm using 4-fold of the 20/2 worsted wool from Norway that Kathe Todd-Hookers sells at Fine Fiber Press .  I've used black, white and grays for a few tapestries in the past and was inspired by Kathy Spoering's recently completed piece that's primarily black, white and gray to do this piece in monochromatic.  Link here to see Kathy's tapestry at her blog.

The tapestry is at the half-way point today and I hope to finish it before the weekend.  I'll also be taking a tapestry loom to the event venue the day before when artists who have donated works will be setting up to demonstrate with their techniques.  Most will be doing drawing or painting, I think; maybe having the loom there so one can see how it's actually done will make the little piece more appealing for bidders--at least I hope so.

The design was based on a very quick, loose sketch I did last summer at one of my favorite places in the world, the property at Sapphire owned by my friends, Noel and Patrick.  A couple of waterfalls there are ones I've photographed and drawn many times through the years.  The sketch I'm working from didn't have much color information to guide me along and I didn't want to refer to one of the photos since I'd hoped to make the tapestry more stylized.   I made a line drawing of the sketch by tracing basic outlines, leaving out a bit and adding a few other lines.  I then added value to the simplified shapes by filling in with pencil, scanned and opened in Photoshop.  I used various filters to manipulate and simply further.  I don't keep good notes about filters I go through to get the final image--just play around until my eye seems to like what I see.  This was a cutout filter but was done after other filters had been used to change things around a bit.

Because the piece is so small I was able to print out the design on regular 8.5 x 11" paper to use as the cartoon--it can be seen stitched at the back of the weaving.

P.S.  Here's the tapestry as I leave the studio today, 11-25-09.  I rotated the photo so it's seen in the direction it will hang.


Monday, November 23, 2009

Leaf Dance


Completed on October 30, 2009.  The size is 48" high x 53" wide.  Warp is 12/18 cotton seine twine sett at 6 ends per inch.  Weft is wool/spelsau yarn (Vevgarn) from Norway used 3-fold.  Warp ends are finished with half-Damascus edge.  The hanging is by velcro strip attached to top of the tapestry (soft side) and hook side of velcro attached to wooden bar (see last post for end finishing description).

The title I've given it--"Leaf Dance"--seemed to be the only appropriate one.  I often have titles for tapestries running through my mind while I work on them, or I search for something to fit the feeling I have for the image after it's woven.  The title for this one was quite a struggle.  Maybe one reason for that was because the image is a bit different for me--more loose, related to the source (nature) through emotion rather than observation.  As I considered what to name the tapestry, the playing with leaf-like shapes that I was doing in the paintings made last fall kept coming to mind. The loose painting this tapestry was based upon was one of several I did during the directed studies at Steve Aimone's studio in Asheville last November... this link show several of us working during the days there.  And much of the time you could say we were sort of dancing with the images we were making--moving back and forth, in and out, Steve commenting, "When in doubt, make BIG changes!"

As I worked on this I also was influenced by a visit to Silvia Heyden's home last spring; that trip took place just as I'd begun the tapestry and after the meeting with her I felt empowered to weave for the sake of weaving... not just for the image.  I was able to take the tapestry to show her when she gave the recent workshop for Tapestry Weavers South... here she is taking a look (photo courtesy of Holly Wilkes) and giving her comments.  Silvia said she could see five more tapestries based on this one!  Unfortunately, my eyes and brain can't quite wrap around that concept yet... but maybe soon!


Four more paintings from the intense time last fall wait to be considered for tapestry.  All are loose and free, nature based but emotional response rather than observational studies.  I'm eager to see where this all leads--got to get the big loom warped again in a few days!

Thursday, November 19, 2009

tapestry finishing process

The large tapestry has been in stages of completion since I cut it off the loom on October 30.  It would be so nice to really have the tapestry "done" when the warp is snipped.  But that's not the case!  Although the finishing steps take a relatively short time compared to the actual weaving they are still time consuming.  I find them to be a boring, sometimes painful, yet very necessary part of the process.

So here's what I've done to complete this particular tapestry.

1.  Before beginning the piece I made a decision about how I would finish the tapestry without hems.  I was going to use a very thin light color border around the whole piece--so I reasoned that I could let the warp show a tiny bit at the edge.  This would eliminate the bulk of a hem for the 6 epi sett with a 3-fold weft.   I knew I'd either use half-Damascus edge to secure the warp ends and tuck to the reverse at the same time, or that I would "hide and snip" the warp ends.  That's my term for what happens when alternate warps are threaded up along the channel of an adjacent warp.  The warp that is secured within the weaving creates a loop at the move over; the warp it goes up along is then snipped off flush at the edge of the weaving.


Once finished I choose half-Damascus for the warps.  This is much easier on my hands.  After working across the edge I stitch groups of warps to the surface with a sewing thread looped around a small group.  I find using a curved needle for this step works well.  I then cut off the warps to about 3" long.

2.  I cover the warp ends with a binding tape.  Here I've used cotton twill tape that I bought from Near Sea Naturals.  I basted the twill tape in place then stitched at each side, again using the curved needle.


3.  I wanted to hang the piece using a velcro covered webbing that will attach to a velcro covered wooden bar.  Because the tapestry is heavy (weighs in at 5 1/2 lbs.) I wanted a tape that was heavier than the twill tape used to cover the bottom.  I did some searching online for the kind of webbing that's used in upholstery--the jute or cotton webbing.  I found several sources but couldn't locate any in a store within an hour+ drive (plus, I've been fighting a massive sinus melt-down and didn't want to be driving around all over Atlanta to search out this elusive webbing).

I stewed over this problem overnight after finishing the lower area with the thinner twill tape.  Next morning it occurred to me that I could WEAVE my own webbing!  So that's what I did.  I used 12/6 cotton seine twine for the warp, sett at 20 epi (with both selvedges doubled for two warps at each side).  For weft I used the 12/18 warp remains from the tapestry.  Since it was only 64 warp ends, warping and threading was a breeze.  I had it warped, threaded, woven and washed in a day's time.  


Next morning, I pressed the newly created tape, snipped off the weft ends, and stitched on the velcro.


4.  Then came one of the more painful parts of the process (although any needle use is fairly challenging for me)... that of stitching on the velcro covered webbing to the tapestry.


I have a little trouble typing this because of the tiny cuts from needle pricks still in my fingers... I only bled twice, though, which is pretty good for me.  This webbing I wove is indeed sturdy and I was catching warp ends ever so often to help with the weight distribution.  

5.  Last, I covered the wooden bar with the hook side of the velcro.  I first sanded the bar then applied the velcro, an industrial strength adhesive velcro.  I attached eye screws to the top of the bar for hanging. Here I'm using an awl as a turning tool with the eye screw.


The tapestry is hanging now for photographing.  It was shot last night but still need to have more done with a different camera, one capable of recording the detail I want.  

New tapestry?  Nothing large is in the works yet but I have a small piece that's on my Hagen loom that will be used for a demonstration in a few weeks.  I want to have it to an interesting place for that event so that's what I'll be concentrating on for the next few days.

Ideas for the next large piece are bubbling around though... incubation time.

Friday, November 13, 2009

humbling ...


Last night I was honored to receive one of two special awards by members of the Georgia Art Education Association.  The award, a beautiful handblown glass piece by David Goldhagen , says:


Lifetime Achievement Award
Presented to
Tommye McClure Scanlin
Our Mentor and Friend
In recognition of a lifetime dedication
to craft education
2009 GAEA Conference
Clebrating American Craft in the Southern Mountains
November 12, 2009

The other award was given posthumously to Bob Owens, who I consider to be my mentor in many things, including how to be a craftsperson and a teacher.  Bob was an exceptional artist as ceramicist and sculptor, and he also excelled in drawing and painting.  He was my first art teacher when I was a college student and later, after I'd completed my degree, Bob hired me to become part of the art department at North Georgia College.  I worked with Bob Owens as a colleague for twenty-five years until his retirement in 1997.  Upon leaving the university he continued to teach and inspire students at John C. Campbell Folk School as well as in his home studio where he created many works before his very untimely death in 2004 at age 67.

Bob Owens  lived this life as a perfect role model of artist, craftsperson, teacher, mentor, friend, as well as community leader and he is more than deserving of such an award.  Whether I'm worthy of the honor... time is yet to tell, I think; that's why this is a humbling experience even as I'm very grateful for the recognition by the art education group.  Maybe a couple of decades from now, when I'm no longer able to travel to teach a workshop or point someone to resources I know about or become excited when I see the passion for craft budding in someone (whether young or old)--maybe then I'll be deserving of "... recognition of lifetime dedication to craft education."  Until then, I'll keep plugging away and having fun on the journey!

Thursday, November 5, 2009

Happy people at Silvia Heyden's workshop in Durham, NC

Here are the workshop participants and Silvia Heyden in our "graduation photograph" taken on the last day we spent with her near her home in Durham, NC.  The four days of time with her have been extremely inspirational.  It definitely has been a master class with a master tapestry artist.
More thoughts and photos will come later... now my task is to get home tomorrow before 2 p.m. for a meeting at our house!


Friday, October 30, 2009

and it's off!


Just after the cutting off--

and now, hanging up and out of the way.  The studio is a MAJOR wreck and needs excessive vacuuming--yes, I do mean excessive.


I'm very happy to have this off the loom by my end-of-October self-imposed deadline.  I looked back in a studio journal today and see that I was beginning the weaving on June 3.  Almost five months... but quite a bit of that time was spent not weaving--at least on this tapestry.

I'll be using half-Damascus for the edges, then sewing a velcro strip at the top to be attached to velcro covered wood bar.  Finishing will start tomorrow.

Now... to concentrate on the workshop experience coming up next week!  Four days with Silvia Heyden--how I'm looking forward to it.  The inspiration I gained from spending a short time with her in May, along with other TWS members, is reflected in this tapestry.  Wonder what next week will bring?!

Thursday, October 29, 2009

just a few more passes to go!


but I can't take anymore tonight... after all, tomorrow IS another day.

Wednesday, October 28, 2009

ok, tapestry isn't complete and I'm distracted by...

preparations for a workshop that I'm going to present in early December at ECHO School in Tiger, GA.  Peggy McBride, owner of Globe Gallery in Clayton, has opened a new arts school nearby.  She's been conducting classes at the gallery and the demand for space has grown to the point that she's making a leap into another location in which she'll be offering workshops, short classes and mini-artist residencies.

I'll be one of the first instructors as she launches the venture and I'm very happy about that.  Peggy has been a friend for many years; we've been involved in lots of creative adventures together including exhibits, workshops, informal critique sessions and other exciting things.  Her art work is just amazing--she moves among media with the ease of a shape shifter.   It's a pleasure to just see her once in awhile to vicariously share in her energy.


This is a pile of stuff on my worktable today.  Tomorrow I'll dig out older paper weavings, get them scanned so I can begin manipulating with filters in Photoshop Elements.  Here are a few things I did with that yesterday and today... taking the paper woven piece, scanning and then working with them further.


The workshop that's in the planning stages is for three sessions about paper weaving, held on consecutive days.  My intention is to have a different approach for each day, starting with plain weave and moving on from there.  I've used paper weaving for many years in my teaching after I discovered the book Weaving Without a Loom by Sarita Rainey back in the early 1970s.  My copy is from 1969, in fact.  I did a web search for the book this morning and found that it's in a second edition--hooray!  More folks will find it and become inspired, I hope.

Classes in which I've used paper weaving have been art education, color theory and--of course--weaving.  I've also taught the method to children and have presented it when I've done short design workshops.  I've used paper weaving myself many times and sometimes the resulting images have become the source of tapestry pieces.  I wrote an article for Handwoven magazine in 1986 about paper weaving, in fact.  The tapestry below is called "Tree Fragments" and was based on a section of a paper weaving I did combining two different photographs I'd taken of trees.  Size of the tapestry is about 16" wide x 42" long.


My work with this technique is certainly not unique.  Other artists have created wonderful pieces with paper weaving, Suzanne Pretty for one--check out her images created in the medium in her ATA Web Exhibition curated by Janet Austin at this link.

José Fumero is also known for his elaborately cut and woven images.


And--I really have made quite a bit of progress of the tapestry after all.  Here it is as I begin working on it for an hour or so this afternoon: