
Monday, November 30, 2009
Saturday, November 28, 2009
this one's off the loom... now to finish it
I cut off the small tapestry of the trees and waterfall a short while ago. I'll let it rest overnight (or is that I'll let myself rest overnight?)--anyway, some resting will take place before the next steps of the finishing process. Here's the small tapestry ... raw from the loom:


This will be mounted onto a natural color handwoven twill fabric that I'll stretch over a board; I'll cut the board to be slightly larger than the tapestry to leave have about 1/2" on all four sides or whatever amount will allow me to use a frame I have on hand. I haven't measured what I've got yet but I think I have an 8 x 10" shadowbox frame and that would work just fine for this piece.
Before stitching the tapestry on the fabric covered board I'll use a half-Damascus edge to complete the end finish. That will take the warp ends to the back of the piece. I might block the tapestry before doing the ends; I'll decide on that tomorrow after seeing how it looks after relaxing for the night.
This piece was woven at the end of a warp threaded on the Tissart loom--I'd mentioned that before but thought I'd show the loom with the several smaller weavings that are happening side by side. Cutting this one out has left a gaping hole but there's several inches of weave-able warp remaining.


I'll tie it back onto the cloth beam bar, by lashing on like I did for this part, once I've woven the other sections up to that point and cut them off.


I don't always have enough warp remaining on a wider piece to use for smaller things but when I do I try to squeeze as much out of the loom as I can.
Wednesday, November 25, 2009
A fantastic web exhibition of tapestries!
I just have to note this link to a web exhibit of tapestries by Inyul Heo, a Korean artist. It's curated for ATA by Barbara Burns and please visit and experience movingly beautiful art works!
Tuesday, November 24, 2009
next tapestry underway...

... this is a small one I started last Saturday. I'm doing it for an auction that will be held on December 5 during the annual Festival of Trees to benefit Challenged Child and Friends, an organization in north Georgia that serves children with disabilities and their families. My husband and I have taken part in fund raising auctions with this group for several years now.
The tapestry will be 8" w x 10" h. The sett sett is 8 epi, a cotton seine twine warp remains from a previous large tapestry woven on my Tissart loom. For weft I'm using 4-fold of the 20/2 worsted wool from Norway that Kathe Todd-Hookers sells at Fine Fiber Press . I've used black, white and grays for a few tapestries in the past and was inspired by Kathy Spoering's recently completed piece that's primarily black, white and gray to do this piece in monochromatic. Link here to see Kathy's tapestry at her blog.
The tapestry is at the half-way point today and I hope to finish it before the weekend. I'll also be taking a tapestry loom to the event venue the day before when artists who have donated works will be setting up to demonstrate with their techniques. Most will be doing drawing or painting, I think; maybe having the loom there so one can see how it's actually done will make the little piece more appealing for bidders--at least I hope so.
The design was based on a very quick, loose sketch I did last summer at one of my favorite places in the world, the property at Sapphire owned by my friends, Noel and Patrick. A couple of waterfalls there are ones I've photographed and drawn many times through the years. The sketch I'm working from didn't have much color information to guide me along and I didn't want to refer to one of the photos since I'd hoped to make the tapestry more stylized. I made a line drawing of the sketch by tracing basic outlines, leaving out a bit and adding a few other lines. I then added value to the simplified shapes by filling in with pencil, scanned and opened in Photoshop. I used various filters to manipulate and simply further. I don't keep good notes about filters I go through to get the final image--just play around until my eye seems to like what I see. This was a cutout filter but was done after other filters had been used to change things around a bit.
Because the piece is so small I was able to print out the design on regular 8.5 x 11" paper to use as the cartoon--it can be seen stitched at the back of the weaving.
P.S. Here's the tapestry as I leave the studio today, 11-25-09. I rotated the photo so it's seen in the direction it will hang.

Monday, November 23, 2009
Leaf Dance

Completed on October 30, 2009. The size is 48" high x 53" wide. Warp is 12/18 cotton seine twine sett at 6 ends per inch. Weft is wool/spelsau yarn (Vevgarn) from Norway used 3-fold. Warp ends are finished with half-Damascus edge. The hanging is by velcro strip attached to top of the tapestry (soft side) and hook side of velcro attached to wooden bar (see last post for end finishing description).
The title I've given it--"Leaf Dance"--seemed to be the only appropriate one. I often have titles for tapestries running through my mind while I work on them, or I search for something to fit the feeling I have for the image after it's woven. The title for this one was quite a struggle. Maybe one reason for that was because the image is a bit different for me--more loose, related to the source (nature) through emotion rather than observation. As I considered what to name the tapestry, the playing with leaf-like shapes that I was doing in the paintings made last fall kept coming to mind. The loose painting this tapestry was based upon was one of several I did during the directed studies at Steve Aimone's studio in Asheville last November... this link show several of us working during the days there. And much of the time you could say we were sort of dancing with the images we were making--moving back and forth, in and out, Steve commenting, "When in doubt, make BIG changes!"
As I worked on this I also was influenced by a visit to Silvia Heyden's home last spring; that trip took place just as I'd begun the tapestry and after the meeting with her I felt empowered to weave for the sake of weaving... not just for the image. I was able to take the tapestry to show her when she gave the recent workshop for Tapestry Weavers South... here she is taking a look (photo courtesy of Holly Wilkes) and giving her comments. Silvia said she could see five more tapestries based on this one! Unfortunately, my eyes and brain can't quite wrap around that concept yet... but maybe soon!

Four more paintings from the intense time last fall wait to be considered for tapestry. All are loose and free, nature based but emotional response rather than observational studies. I'm eager to see where this all leads--got to get the big loom warped again in a few days!
Thursday, November 19, 2009
tapestry finishing process
The large tapestry has been in stages of completion since I cut it off the loom on October 30. It would be so nice to really have the tapestry "done" when the warp is snipped. But that's not the case! Although the finishing steps take a relatively short time compared to the actual weaving they are still time consuming. I find them to be a boring, sometimes painful, yet very necessary part of the process.
So here's what I've done to complete this particular tapestry.
1. Before beginning the piece I made a decision about how I would finish the tapestry without hems. I was going to use a very thin light color border around the whole piece--so I reasoned that I could let the warp show a tiny bit at the edge. This would eliminate the bulk of a hem for the 6 epi sett with a 3-fold weft. I knew I'd either use half-Damascus edge to secure the warp ends and tuck to the reverse at the same time, or that I would "hide and snip" the warp ends. That's my term for what happens when alternate warps are threaded up along the channel of an adjacent warp. The warp that is secured within the weaving creates a loop at the move over; the warp it goes up along is then snipped off flush at the edge of the weaving.

Once finished I choose half-Damascus for the warps. This is much easier on my hands. After working across the edge I stitch groups of warps to the surface with a sewing thread looped around a small group. I find using a curved needle for this step works well. I then cut off the warps to about 3" long.
2. I cover the warp ends with a binding tape. Here I've used cotton twill tape that I bought from Near Sea Naturals. I basted the twill tape in place then stitched at each side, again using the curved needle.


So here's what I've done to complete this particular tapestry.
1. Before beginning the piece I made a decision about how I would finish the tapestry without hems. I was going to use a very thin light color border around the whole piece--so I reasoned that I could let the warp show a tiny bit at the edge. This would eliminate the bulk of a hem for the 6 epi sett with a 3-fold weft. I knew I'd either use half-Damascus edge to secure the warp ends and tuck to the reverse at the same time, or that I would "hide and snip" the warp ends. That's my term for what happens when alternate warps are threaded up along the channel of an adjacent warp. The warp that is secured within the weaving creates a loop at the move over; the warp it goes up along is then snipped off flush at the edge of the weaving.

2. I cover the warp ends with a binding tape. Here I've used cotton twill tape that I bought from Near Sea Naturals. I basted the twill tape in place then stitched at each side, again using the curved needle.

3. I wanted to hang the piece using a velcro covered webbing that will attach to a velcro covered wooden bar. Because the tapestry is heavy (weighs in at 5 1/2 lbs.) I wanted a tape that was heavier than the twill tape used to cover the bottom. I did some searching online for the kind of webbing that's used in upholstery--the jute or cotton webbing. I found several sources but couldn't locate any in a store within an hour+ drive (plus, I've been fighting a massive sinus melt-down and didn't want to be driving around all over Atlanta to search out this elusive webbing).
I stewed over this problem overnight after finishing the lower area with the thinner twill tape. Next morning it occurred to me that I could WEAVE my own webbing! So that's what I did. I used 12/6 cotton seine twine for the warp, sett at 20 epi (with both selvedges doubled for two warps at each side). For weft I used the 12/18 warp remains from the tapestry. Since it was only 64 warp ends, warping and threading was a breeze. I had it warped, threaded, woven and washed in a day's time.

Next morning, I pressed the newly created tape, snipped off the weft ends, and stitched on the velcro.


4. Then came one of the more painful parts of the process (although any needle use is fairly challenging for me)... that of stitching on the velcro covered webbing to the tapestry.

I have a little trouble typing this because of the tiny cuts from needle pricks still in my fingers... I only bled twice, though, which is pretty good for me. This webbing I wove is indeed sturdy and I was catching warp ends ever so often to help with the weight distribution.
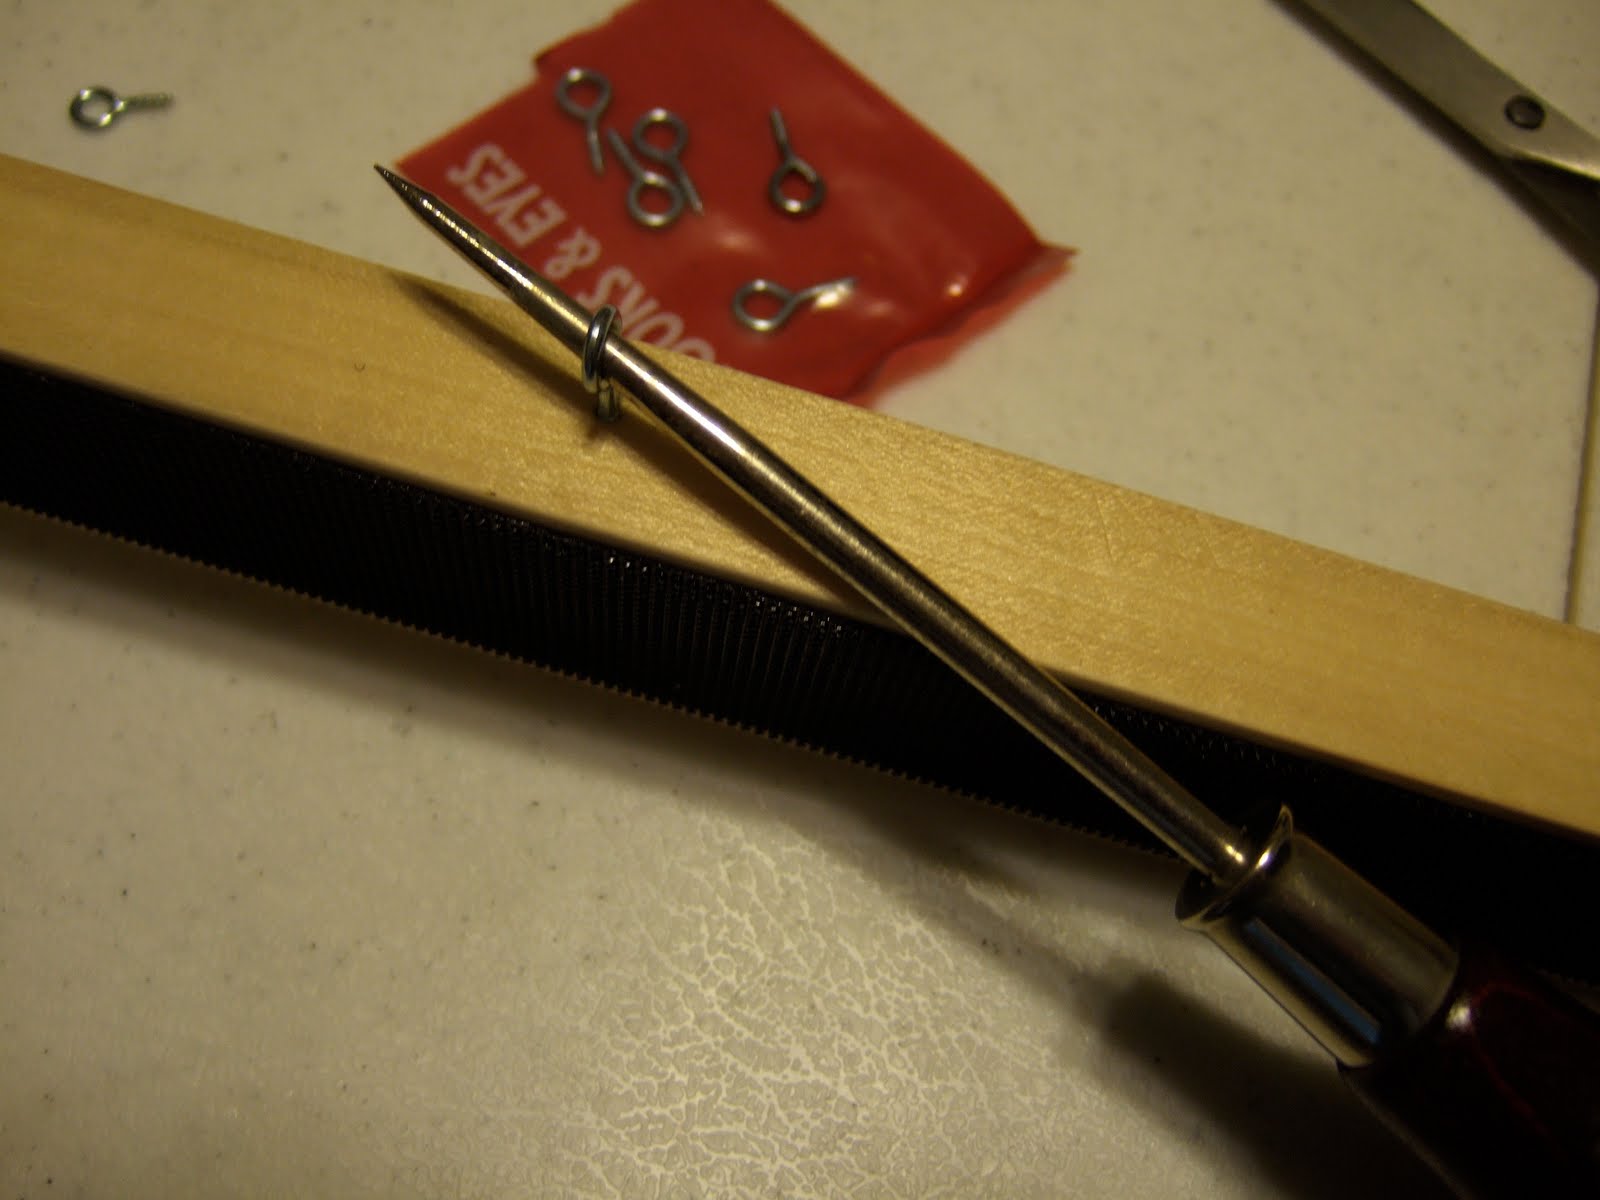
5. Last, I covered the wooden bar with the hook side of the velcro. I first sanded the bar then applied the velcro, an industrial strength adhesive velcro. I attached eye screws to the top of the bar for hanging. Here I'm using an awl as a turning tool with the eye screw.
The tapestry is hanging now for photographing. It was shot last night but still need to have more done with a different camera, one capable of recording the detail I want.
New tapestry? Nothing large is in the works yet but I have a small piece that's on my Hagen loom that will be used for a demonstration in a few weeks. I want to have it to an interesting place for that event so that's what I'll be concentrating on for the next few days.
Ideas for the next large piece are bubbling around though... incubation time.
Friday, November 13, 2009
humbling ...

Last night I was honored to receive one of two special awards by members of the Georgia Art Education Association. The award, a beautiful handblown glass piece by David Goldhagen , says:
Lifetime Achievement Award
Presented to
Tommye McClure Scanlin
Our Mentor and Friend
In recognition of a lifetime dedication
to craft education
2009 GAEA Conference
Clebrating American Craft in the Southern Mountains
November 12, 2009
The other award was given posthumously to Bob Owens, who I consider to be my mentor in many things, including how to be a craftsperson and a teacher. Bob was an exceptional artist as ceramicist and sculptor, and he also excelled in drawing and painting. He was my first art teacher when I was a college student and later, after I'd completed my degree, Bob hired me to become part of the art department at North Georgia College. I worked with Bob Owens as a colleague for twenty-five years until his retirement in 1997. Upon leaving the university he continued to teach and inspire students at John C. Campbell Folk School as well as in his home studio where he created many works before his very untimely death in 2004 at age 67.
Bob Owens lived this life as a perfect role model of artist, craftsperson, teacher, mentor, friend, as well as community leader and he is more than deserving of such an award. Whether I'm worthy of the honor... time is yet to tell, I think; that's why this is a humbling experience even as I'm very grateful for the recognition by the art education group. Maybe a couple of decades from now, when I'm no longer able to travel to teach a workshop or point someone to resources I know about or become excited when I see the passion for craft budding in someone (whether young or old)--maybe then I'll be deserving of "... recognition of lifetime dedication to craft education." Until then, I'll keep plugging away and having fun on the journey!
Thursday, November 5, 2009
Happy people at Silvia Heyden's workshop in Durham, NC
Here are the workshop participants and Silvia Heyden in our "graduation photograph" taken on the last day we spent with her near her home in Durham, NC. The four days of time with her have been extremely inspirational. It definitely has been a master class with a master tapestry artist.
More thoughts and photos will come later... now my task is to get home tomorrow before 2 p.m. for a meeting at our house!

More thoughts and photos will come later... now my task is to get home tomorrow before 2 p.m. for a meeting at our house!

Subscribe to:
Posts (Atom)


